

COME JOIN US AT PRE-SEARING OFFICIAL!
This invite link will never expire.

Warrior Guide
Sections:

I) Intro:
Hey everyone, this guide was written by myself, for these boards specifically. This is a current, and up to date guide on Warriors in Pre! It explores everything from gear, to skills, into builds then hunting! Please read it, try it, and provide feedback so we can improve our community guides.
-Cheers, Lord Arrow.
II) Credits:
I Lord Arrow I
III) Gear:
More important to Warriors than just about any other profession, you'd be lucky to have multiple weapons, generally the bonus hammer is the way to go for hammers, and if you're lucky enough to have the bonus Glacial Blade, then that's a great choice also. But for those who don't, fear not! Warriors have been a force to be reckoned with in Pre-Searing since long before the availability of Imps and Glacial Blades.
Swords: Whilst swords don't directly deal as much damage as axes, they have 2 great skills to use in Pre-Searing, and don't require any extra energy investment to use. I'd recommend swords for high energy use, or tanking related builds, because the DPS from bleed deals damage even while you're healing, and since both skills require adrenaline, you can use the left over energy for beneficial skills from the other professions. Popular choices among swords include the Glacial Blade, and the Rinblade which can be made by Arthur Ayala [Weapons] in Ascalon City.
Axes: Axes deal a higher overall damage, this is primarily due to the fact that they have a higher maximum damage stat, which is the stat used when calculating critical damage; with a high enough axe mastery you'll be sending a lot of critical blows against the Charr, since it is a level based statistic, and the Charr levels aren't very high compared to a well trained Pre-Searing character. There are 2 axe skills available to a warrior, both increase damage of the attack, and one of them is actually a PBAoE (Point Blank Area of Effect) which is fantastic, because who doesn't want to hit multiple Charr at once? one of these skills cost energy, which you'll want to spam often. I'd recommend axe users to focus on DPS over tanking.
Hammers: Hammers are an oft-neglected choice, this is because they only have 1 available skill in Pre-Searing, which doesn't really do any extra damage. The truth is, it's a knockdown, and doesn't need to do extra damage, what does 10, 20 or even 30 extra damage matter if you're going to kill Charr with the next hit regardless? Hammers have also recently received an indirect buff by the Vanguard Initiate armour boost, which actually reduced the usefulness of shields by giving you a set amount of armour, so you can keep swinging all day long.
Bows: Recently lost some popularity on Warriors due to the Vanguard Initiate buff, but are still very fun and very viable, many players used to level up on Charr with a W/R bow build, focusing on staying alive at the low levels. You now have access to all 3 bow skills, however Powershot is useless (as it does less damage than a normal shot) and Point Blank Shot can't get any stronger because you don't have access to the Expertise line, no worries though because it still deals solid amount of damage, and you may as well use it when they survive your Dual Shot. You also get access to Preparations, Troll Unguent and pets! even if you aren't running a Ranger secondary, or using bows for primary damage, it is still highly recommended to keep one around for pulling mobs, preferably a Flatbow, or Longbow.
Shields: A great boon to the warrior armoury! Only for use with Swords, Axes, and wands. Although the base armour a shield provides is useless now thanks to our Armour Initiate buff, the other modifiers such as +hp, +armour against Charr or -Damage taken, are all still great! The quest: Bandit Raid given out by Baron Egan in Ascalon City offers a Tallshield with not only a cool skin, but also an incredible +10 vs Charr and +15hp to boot; even Ascalon's Elite and wealthy will be hard pressed to find a dual-mod Charr shield that can beat that.

Weaponry to look for, in Swords is anything above 10-14 in damage Axes, generally 6-15 and hammers 13-21 with decent inherent's. The most sought after inherent mods are xx% more damage while health is above 50% (aka: xx^50) the max for those is 14^50, the other mods people look for are:
xx% damage while hexed
xx% damage while health under 50%
xx% damage while in stance (great of W/R Frenzy users)
xx% damage while enchanted (Useful on a W/Mo)
You can also attach 2 other modifiers to your weapons, all 3 martial weapons can benefit from Sundering mods (for extra armour penetration) Fortitude mods (extra health, up to +28 from a weapon in Pre) and if you can afford them, Charr Slaying mods (% based extra damage to Charr the lower the cheaper, i'd recommend looking for a 13-15% mod as any more is just for show and the price point on 13-14 is low enough you can afford it after a few good Charr runs) example of a relatively affordable, but very viable Rinblade. Be wary: Not all modifiers on bonus weapons can be replaced.

Now that you have your weaponry settled, we're moving onto armour and runes i'd suggest using collectors armour but it doesn't really matter anymore the Vanguard Initiate armour bonus sets your armour to an unchangeable amount which changes with your level, so that also means all +armour runes/insignia's are useless! I'd suggest using Knight's (Damage reduction which still works) or Radiant and Survivor insignia's (energy/health) as for runes, of course pick up the new helmet from Professor Yakkington outside Fort Ranik for 50 flowers. The runes of choice are: Swords, Axe, or Hammer Mastery, Tactics, Strength Minor Vigor, and the Warrior only: Minor Absorption.
IV) Builds:
There are different builds and skills in Pre (believe it or not) some of them are very very viable for both Charr & Vanguard mobs, others can be mostly preference based or a build just for the fun of it!
1: W/-- no secondary Warrior
*Skills:
First 2 skills are weapon based:
Sever Artery/Gash,
Executioner's Axe/Cyclone Axe,
or
Hammer Bash/--
(3) Frenzy
(4) Healing Signet
(5)--
(6)--
(7) Hammer Bash/Cyclone Axe
(8) Resurrection Signet
Use: First 2 skills are going to be primary damage, if you're running hammer I'd fill it with whatever you can grab from a temporary secondary that doesn't slow down your swinging, 3 Frenzy is great for building adrenaline, or maintaining momentum, it's worth it until you really start losing hp Healing Signet being your only real heal, is just good to have around i tend to leave my tactics around 8 or so for a 130hp heal, the empty slots remaining can be used from temporary secondary skills such as Troll Unguent for +3 regeneration (cast before entering battle) and a pet! through Comfort Animal, Mesmer is also viable for a quick 60hp heal from Ether Feast! Skill slot 7 can be hammer bash to switch to for a quick knockdown (keep a hammer on your) or Cyclone axe if you're running hammer to gain some quick adrenaline in a Charr ball. That leaves resurrection signet, which is a staple in any Pre-Searing build i leave it on me even if I go solo, just so I never forget it, and there's nothing really else to put there anyways.
Attributes: Axe/Sword/Hammer Mastery = Priority #1, Tactics = Priority #2 then dump the remainder into Strength, and don't worry about that armour pen, it doesn't do much here anyways!
2: W/Mo The Wammo
*Skills:
First 2 skills are weapon based:
Sever Artery/Gash,
Executioner's Axe/Cyclone Axe,
or
Hammer Bash/--
(3) Symbol of Wrath
(4) Frenzy
(5) Shielding Hands/Healing Breeze
(6) Healing Signet
(7) Bane Signet
(8) Resurrection Signet/Reversal of Fortune
The time-tested Wammo has been used in this game since day one, Pre is no exception. it's one of the most versatile build-sets in Pre, and everyone runs it differently especially now that Warriors have access to Healing Breeze thanks to Hablrik [Skills]
Here's the kicker, your weapon set matters a lot for this build. If you are using an axe, which costs a bit more energy to manage, you'll have better luck with protection prayers, namely Shielding Hands. due to Healing Breeze's high energy cost it's a lot harder to maintain while spamming Cyclone Axe & Symbol of Wrath; if you are set on using healing prayers + an axe, it is doable by running full Radiant insignia's, Cupcakes or consumables that boost energy will solve this also.
If you were to use a Sword/Hammer you're in luck! the Glacial Blade is the perfect weapon for a Wammo if you have access to it, it allows Healing Prayers work well to keep your damage buffed, focus more on swinging than using signets with this setup.
Your Attribute layout will look like this:
Attributes: Axe/Sword/Hammer Mastery should be maintained to meet your weapon requirement, at level 19-20 this would mean having at least 9 in that. Smiting will be your highest Attribute, followed by a balance of Tactics and Healing/Protection (depending which of the 2 you're running) and the remainder of your points dumped into strength.
Reversal of Fortune should be brought if sticking to solo runs it can be used as a last attempt life-saver, or to cover other enchants from being stripped. If you're running the healing prayers variant of this build, you can bring Shielding Hands as coverage for your Healing Breeze also.
Lastly; you're wondering if Banish & Retribution were forgotten, no they were not Banish just does less damage than your melee weapon will, and Retribution makes it VERY difficult to manage energy and provides very little damage; However, it can be used please play around with it and share your results with the community!
3: W/R Melee tank
*Skills:
First 2 skills are weapon based:
Sever Artery/Gash,
Executioner's Axe/Cyclone Axe,
or
Hammer Bash/---
(3) Frenzy
(4) Healing Signet
(5) Troll Unguent
(6) Comfort Animal
(7) Hammer Bash/Cyclone Axe
(8) Resurrection Signet
This is one of the most viable setups for the Warrior! especially considering you can use a bow to help hunt at lower levels (more on that below) as the usual, your first 2 skills are weapon choice based, Frenzy is the ever fun adrenaline builder, please be wary using it too early though as you can take a lot of damage, the idea behind this build that sets it apart from the W/-- build (that can also run troll unguent) is that with this build it'll actually be worth using in the midst of a fight! Of course pre-cast it before you head into danger, but if it runs out, don't be afraid to re-cast it, at level 19-20 you could easily sit at +7 regeneration from that, combined with your armour will make you very difficult to kill.
Comfort animal has been updated to allow you to keep a pet around with out having Charm Animal on your skill bar! in the warrior's case, just allow your pet to stay on guard for the most part, since you're both melee, you'll find it won't often aggro mobs you didn't intend to, save for when you're pulling with a bow, it's easy enough to switch it to heel then, and return it to guard when you've engaged mobs. Your attributes are as follows:
Attributes: Axe/Sword/Hammer Mastery = Priority #1, Wilderness Survival = Priority #2 and Tactics at a very close #3 (if properly runed, your Tactics & Wilderness Survival should be about the same) the remainder of your points can be dumped into Strength for extra armour penetration!
4: W/R Ranger Danger!
*Skills:
(1) Point Blank Shot
(2) Dual Shot
(3) Frenzy
(4) Read the Wind/Ignite Arrows
(5) Healing Signet
(6) Troll Unguent
(7) Comfort Animal
(8) Resurrection Signet
This build is the exception to having a weapon's mastery rune on your mask! I'd recommend putting tactics in that slot instead, this build is highly recommended when levelling up against the Charr, as it makes pulling and killing from a distance much safer and easier, be sure to mind your pet while doing so however as you don't want to aggro extra mobs.
Skills (1) and (2) are your weapon skills, in this case i chose Point Blank Shot over Powershot, because Powershot does no extra damage, PBS does, even with no points invested into Expertise it still gives +10 damage, which may be worth the energy if you have some to spare and there's melee enemies in your face.
Skill slot (4) is for your preparation, which helps bring the damage up to what it should be, these are very important, please pre-cast them before battle, right before troll unguent is cast. Normally I'd recommend you choose which preparation depending on your choice of weapon, however since the warrior is more energy limited than a ranger, I would personally stick with the more feasible Read the Wind. Remember, you likely won't do the damage that a ranger can do, however they also don't have a chance at getting 70 armour (or 90 vs physical damage!)
Your Attribute Layout will look as follows:
Attributes: Marksmanship = Priority #1, Wilderness Survival is a close 2nd I would then use up most of the remaining points on Tactics, sparing the leftovers for Beast Mastery and Strength.
V: Hunting
Charr hunting is the primary reason to build up any character in Pre. Upon entering the Northlands, continue north until you see 2 Charr groups after a small wall section. The wall can be used to hide behind to heal, or to safely kill the melee Charr without the casters/hunters being able to hit you. Many players choose to ignore these groups and focus hunting the bosses for better loot and experience past level 14. Continue east to the shrine. The first group of 3 can be safely eradicated without pulling or worrying about interference. You can then pick apart the patrolling groups on either side of the shrine with a bow pull (see groups left & right)

Pull these towards you with a bow, and you'll have no concerns of outside Charr interference. Note: Blaze Bloodbane may occasionally reach out and heal these groups, if this makes it too difficult to kill them, just pull back further towards the ledge on either side to get them out of his range. Once the side groups are eliminated, pick apart the Warriors standing guard on either side, and make the pull to Jaw Smokeskin! If you're feeling brave, you can actually pull the boss behind him and take on both at once.You can now pull the other 2 bosses with a bow, or engage them in melee from the sides of the shrine, the left side being the safest to engage from, as there are less potential Charr mobs in the way at this point. To pull both bosses, simply shoot one of them with a bow, and back up, they will eventually gather nicely on the front stairs for you to eliminate.

After this, you can safely round up any other Charr in the area and pick up your loot!
VI: Other Info/Q&A
-
What enemy should I target first?
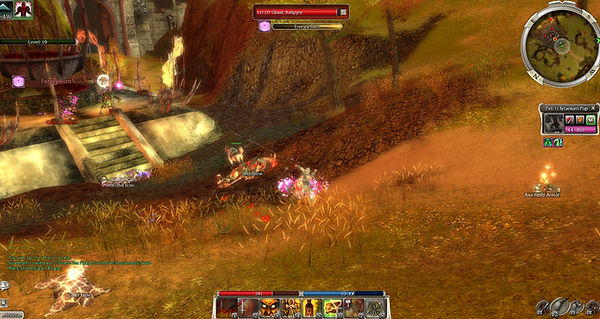
Generally, the Charr hunters or otherwise Casters. The reasons for this is that the melee enemies will do less damage to you, thanks to the armour & insignia's available to Warriors, but also they will likely follow you making for a nice balled up group of enemies, allowing you to use Cyclone Axe, Symbol of Wrath, Firestorm or any other AoE to full effect. Example below of successful balling:

Use cliffs/hills/walls if you have to, using Healing Signet will still decrease your armour a bit, and you may take some fatal hits while you're trying to heal, there's no shame in hiding behind an object to make sure you survive those crucial seconds.
-
I don't have (bonus weapon, or imp) am I still viable as a Warrior?
Of course! Warriors have been around long before any bonus gear, the Rinblade is an absolutely great deal with 10-14, and you can modify it somewhat later on there is also plenty of great Warrior gear on the market, and don't forget your large availability of great runes that other professions can't use!
-
What rune do I use on my helmet?
I would recommend staying away from Strength/Tactics on the helmet, as it'd be wasting the slot, and instead use which ever martial weapon you're using (that may mean having 1 helm for every weapon) this is because the armour penetration from Strength or hp bonus (from Healing Signet) is so minor you won't even notice the difference your extra point in a weapon mastery though will allow you to use the weapon earlier, and increase your chance of landing a critical hit later on.
-
Just how much armour do i get from the Vanguard Initiate buff?
Depending on your level it's 40AR (LVL10-13) 55AR (LVL14-16) or 70AR (LVL17-20) this is a set factor that will not be raised by runes/insignia's or base armour on shields however, damage absorption such as that on Knight's insignia's or the absorption runes, as well as the +armour vs Species (Charr for example) on shields will still work. No worries though, your armour's +20 armour vs. physical damage still works!
Any questions? anything I missed? I can add it to the guide or answer it, just ask me in-game at: I Lord Arrow I.