

COME JOIN US AT PRE-SEARING OFFICIAL!
This invite link will never expire.

Written By Holy Warblade
Welcome to this guide. As more players are re-entering Pre-Searing in their quest to achieve the title of “Legendary Defender of Ascalon”, more emphasis is being sought on the fastest ways to gain XP after reaching level 16. Though there have been many suggestions and ideas thrown around the LDoA thread in the Guru forums, there hasn’t been a single, true and tried, FAST method posted yet. In no way am I trying to knock on the ideas posted by others, in fact, I applaud them for finding their own methods through personal experimentation, but after endless hours of testing, experimenting and discussing with others, I personally believe this guide will show the fastest and most efficient way to not only gain XP Death Leveling through Charrs, but to do so in the least amount of time required to complete setup all the way to killing the leveled up Charrs.
To get things started, we need to examine which Charr groups are available for us to Death Level from. There are two sets of Charr groups. There is the stationary group and the patrol group. The stationary group consists of four Charrs that never venture more than two feet away from their base location. Primary example is the group found near Ben Wolfson’s quest location. These Charrs are only good for hunting and useless to Death Leveling. Next, we have the patrol groups. These groups consist of three or four Charrs that actually patrol from their starting base location and cover a certain amount of land before returning back to their base location. These patrol groups are the single best candidates for Death Leveling. Having established the candidates, let me ask you, how many patrol groups are there over the northern wall? Well, let’s count them.
1) The four man patrol found inside the first ruin on your way to the Charr bosses.
2) The three man patrol found in front of the bosses shrine.
3) Facing the shrine, there is a four man patrol that will come to the edge of left corner.
4) Facing the shrine, there is a four man patrol that will come to the edge of the right corner.
5) The three man patrol found inside the right inner wall just past the bosses shrine.
6) The four man patrol found on top of the hill to the right of the bosses shrine.
Six patrols total. Right? Nope, that’s wrong. There are a total of SEVEN patrols over the wall. Here is group number seven –
7) Beyond the bosses shrine, just beyond the inner right wall road, and next to the bottom lake, there is a three man patrol that ventures a very tiny area. Yup, those guys are a patrol unit.
So, with all the groups added up, there are a total of 25 Charr candidates available for Death Leveling. Okay, so there are a lot of Charrs I can use. How do I pull them?
Pulling/Luring Charrs
Let me share with you how pulling Charrs REALLY works. There are TWO similar methods to pulling Charrs and both work depending on what you are trying to achieve or prevent.
The BASIC foundation of pulling Charrs is to equip any longbow, and shoot one of the Charrs in a patrol from a distance. This will engage the group’s agro and they will start chasing you. As they chase, you are, in turn, running away from them. After running a certain distance, the Charrs will stop, turn around and return to their original location. To nullify this effect and continue the luring, you MUST wait until the Charrs stop running back and start to WALK back. As soon as they start walking, you shoot a Charr again with your longbow and repeat the process. You keep engaging the Charr group through this method until you are able to lure them to any location you want within the Northlands.
Now, about the two methods I mentioned above, both have the same principle as the basic foundation but differ ever so slightly depending on the HP amount you have left or are working with. The first method is to use the basic foundation, and start running away from the Charrs while they are inside or at the border of your agro bubble. The group will actually run with you for quite some distance before they stop on their tracks and turn around. When they stop and turn around, the group will also run back quite a distance before they come to a full stop and start walking. This is the preferred method since it covers quite some ground every time you engage the group.
The second method differs slightly in that you can manage to do the same trick but preserve your HP if you are really low and without time to use a heal skill. Using the basic foundation, you shoot the longbow to one of the Charrs. As soon as the arrow releases, you do not waste time but start running away. This engages the Charr group, but since you started running away BEFORE the arrow hits a Charr, they will be way outside your agro bubble while chasing you. The drawback to this method is that the group will actually not follow you the long distance as the first method. Instead, they cover a smaller distance before stopping and returning. The benefit to this method is that even when they actually do stop, they do NOT run back, but rather come to a halt and initiate the walk right at the stopped location, meaning you can shoot them right away again.
But how does the AI determine the new stop and start locations? In every group, there is a variation of melee and caster units. The caster is always the leader of the group and the melee are always the followers. What this means is that every time the group is lured, chase you, stop, and start walking back, wherever the caster is located at the time of the walk when you re-shoot your arrow is the “new” starting base location for the group. So, even if you had one melee pulled all the way back to the first ruin while the caster is way back and already walking back, it will do no good, since the melee will just run back and follow the caster to however far they have already walked back. Take this into consideration when pulling each group.
Solo Setup Process (Pancake Stacking)
Let’s start the solo setup scenario since 90% of players will be doing setups solo in this game. I will cover the setup process on solo runs first and discuss the pros and cons of solo vs. team setup towards the end.
- Completely shut off GW and restart the game to refresh the game's timer.
- Start off in Ascalon City and find someone who will gladly open the North Wall gate for you.
- Equip yourself with your primary weapons and a LONGBOW (ANY longbow will do).
- Disengage any pet you have equipped BEFORE you leave the city. Pets are a BIG no-no to death leveling.
- You have been dropped off over the wall and are all by yourself in the Northlands.
- Time to clear a path.
- Start by killing all the Oakhearts along the way to the first ruin.
- Upon the first ruin, kill the first stationary Charr group, then follow up by killing the first patrol group too. (Yes, you are getting rid of four candidates, but this is necessary if you are new to setup and want a smooth and quick process. Even if you die while getting rid of one group, it’s okay, since you can rez and just hop over a short distance to meet them again with no DP.)
- [Optional] After getting rid of both Charr groups, there is usually a three man Grawl patrol group to the left of the first ruin. Get rid of them too as they will become a hindrance later when pulling, unless you prefer that Charrs and Grawls battle each other out when they meet, while you heal yourself. Personally, I get rid of them the first time around, as I don’t like to waste time watching them fight each other.)
- Now you face your first patrol. The three man patrol in front of the bosses shrine.
- Switch over to your longbow and get ready to shoot the caster of the group.
- Engage the group using the basic foundation and start the pulling. (Okay, got that far, now where in the world do I take them???)
First and foremost, DO NOT pull them all the way to the rez shrine!!!!!!!!!!!!!!!!!
We will now start the Pancake Stacking method.
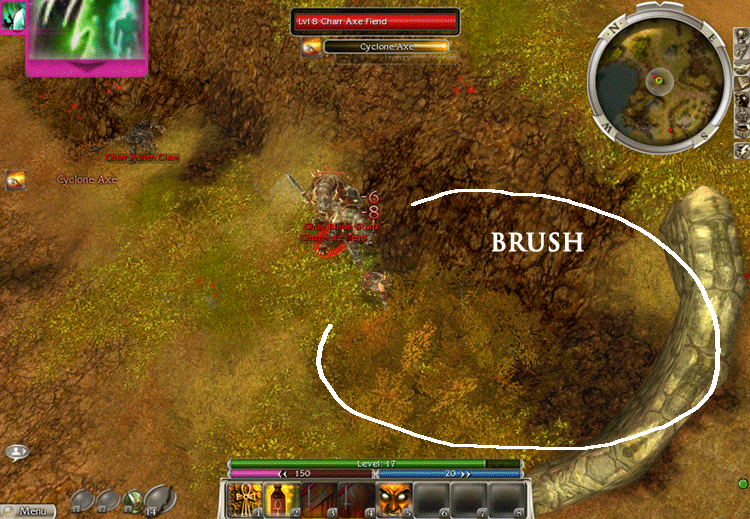
As you are luring the first patrol, bring them all the way to the first ruin where you just killed the two groups of Charr. Continue pulling them down the little house below the first ruin. Now, go down the path of the little house and as you find yourself below the hill, start your process towards the rez shrine. As you are pulling them towards the rez shrine, you will come across a huge brush where the road splits near the beginning of the area. Lure the first group all the way to that brush, but DO NOT go beyond the brush. Get the group as close to the brush, making sure they are all inside your agro bubble and let them kill you right there. If done correctly, they will finish killing you off and be stuck in that same location without being able to return ‘home’. See the picture below on where exactly I have lured them.
After you rez, it’s time to go get another patrol. As you approach the split road, run towards your right, hugging the wall and DO NOT agro the first patrol you just pulled to the brush. Leave that group alone for the time being. We will return to them later.
Go find the next patrol you want to lure. Repeat the same process of pulling them back all the way to the first ruin. Now, DO NOT take them to the same location where the first patrol is located. Rather, lure them down to the little house below the first ruin. If you notice the area below the first ruin, you will see a semi-small hill that separates the house from the first ruin. This is the new location where you are pulling the next patrol. Once the group has been lured below the semi-small hill, let them kill you off. After your death, the group will be stuck on that hill and also won’t be able to return ‘home’. See picture below on where the 2nd location is.

After you rez, it’s time to start the pancake stacking. Run past the first group by the brush WITHOUT agro again. Head towards the second group stuck by the semi-small hill. Running down the path beside the little house, agro the second stuck patrol and head towards the first stuck patrol. As the second patrol starts chasing you, run towards the first patrol and agro them too. Using the same principle, get both patrols as close to the brush as possible. Once both patrols are close to the brush, let them kill you off. Voila! Now you have two groups meshed into one, and both are stuck in the same place.
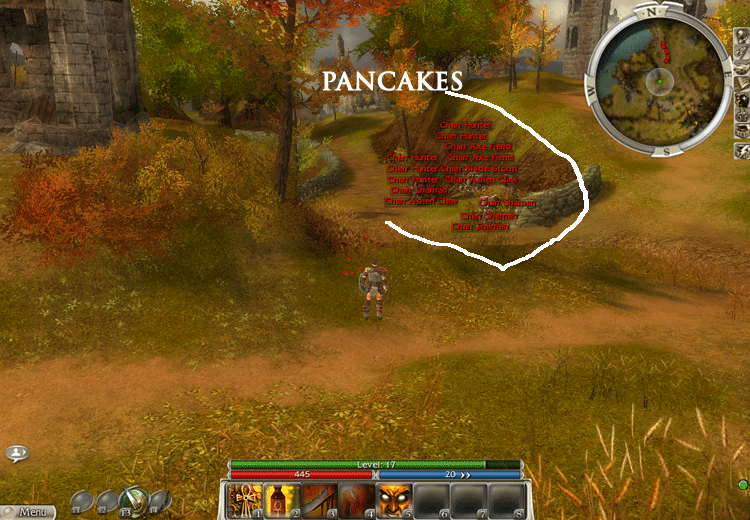
Repeat this same process for as many groups as you want to mesh into a super Charr group. If done correctly, you will have mastered pancake stacking and the super Charr group will look much like the picture below.
Okay, let’s say you have lured three patrol groups and meshed them all into a super Charr group. As soon as you rez again in the shrine, start running towards the super group. But WAIT! As soon as you rez and start running, look to your right, just past the rez shrine. See that small, semi-walled circle enclosure? It almost looks like a children’s enclosed sandlot. Remember this location.
You have a super group of three patrols into one. You are happy with this group and want to start Death Leveling now. Here is the next step. Head towards the super group from your LEFT this time. Do not approach the super group from your right or from above the split road. Get as close to the super group without agro from your left. When you are ready, engage the super group. As soon as you engage the group, start RUNNING back to the rez shrine.
Now remember the enclosed sandlot from above? While you are running back to the rez shrine, this is the new location where you will be running to. While the super group is chasing you, head towards the sandlot and go inside of it and start running circles inside the sandlot. Do NOT go beyond this sandlot. There are two main reasons for it.
1) If you go beyond the sandlot, the super group will disengage and start returning towards the brush, but with the massive amount of damage the super group does while chasing, you will die before they return to the brush and some of them will be in the open area and start walking up the higher road without being stuck. That is bad.
2) By pulling the super group as close to the sandlot, even if you die, the super group will be stuck either inside the sandlot or outside of it, blocked by the sloping hill.
If done correctly, it will look like the picture below.

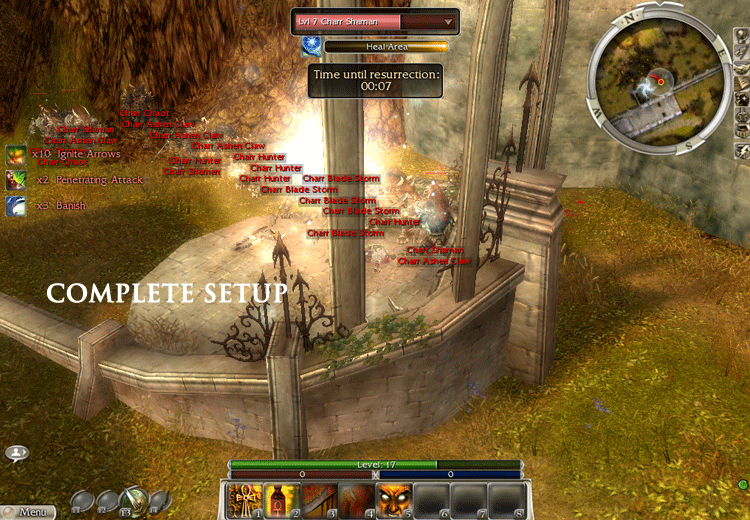
You have lured the super group to the sandlot, and have now rezzed back at the shrine. Time for the Charr to do some major pwnage on the Ascalon archers and monk!!! Go to the sandlot, and agro the super group. As soon as you agro, start running back to the rez shrine. Run past the rez shrine, to the back of the rez shrine and to the far corner of the walls. Two things will happen when you accomplish this. The super group will start targeting the Ascalon archers and monk first, leaving you aside for the time being. They will annihilate the Ascalon group in a matter of seconds without incurring a single death of their own. Once they dispose of the Ascalon group, they will come after you. Since you are at the very far corner, the super group will converge as close to your location as possible. Let them kill you off at this corner. (This is necessary so that after your death, the super group is already surrounding the rez shrine when you come back to life.) When you rez again, voila!, instant setup, just like the picture below. Be sure ALL the Charrs are inside your agro bubble, remove all armor/weapons and enjoy the deaths!
That covers the solo setup process in under 30 minutes!
XP Output & Team Setup
I will discuss the pros and cons of doing a solo setup vs. a team setup next, and how XP gained by Charrs is affected in both scenarios.
When doing a solo setup, the single best scenario for solo players is to be able to achieve a setup consisting of 3 groups. 3 groups with 3 Charrs in each group is the most optimum scenario. These groups should consist of at LEAST 6 melee Charrs and 3 casters. On melee groups, a 2:1 ratio of Hunters vs Axe/Blade is desired. 4 Hunters and 2 Axe/Blade is a good combination. The Hunters are the most desired due to their Penetrating and Ignite skills. Axe/Blade are good for constant spamming attacks. Since there is a 1.0 second differential for arrows to reach you or a 1.0 second difference while recharging their Ignite skills, a constant barrage of Axe/Blade attacks is highly desired. For casters, Ashen Claws are prime candidates. They serve as your personal in-game Vamp wep with their degen skills, thus there is no need for Vamp weps in Pre with this method. Chaots are not so desired since they don’t possess a constant spamming attack, but are good in the fact that they don’t possess any good armor and go down fast even when leveled up. (Note: For Monks and Mesmers classes, Chaots possess Shatter Hex & Shatter Enchant skills and will easily disrupt you unless you aim for them first.) Shamans are the least wanted and the most troublesome.
Concerning Shamans, I personally kill all of them after the setup is complete. Yes, they are another source of Charr to level up for XP, but the trouble you have to go through in order to kill them or while killing another Charr that is leveled up while the Shaman didn’t level up, can be too time consuming. If you do decide to kill the Shamans, do so AFTER the setup is complete, AND after the super group has killed you at least once at the rez shrine.
For the few players that were knowledgable on how to death level through Charrs before this guide came out, a constant issue used to come up with the fact that a group of Charrs would constantly level and another group would never level. The issue and answer to this problem was that each time you lured one group, you had to be killed by that group at least once before you take them to the rez shrine. This is necessary to refresh to the AI target acquisition requirements. Once they killed you, you could go and lure another group and repeat the process to refresh the new group's AI. By following the guide above, one doesn’t have to worry about this issue since each time the group you pull will have to kill you at least once before you take them to the rez shrine.
Even if assuming that all the Charrs gain XP from your deaths, the XP output to each Charr will always be different on solo setups. Common sense should dictate all the Charrs found inside your bubble should gain the same amount of XP from you. That is far from the case in this game. Using a 3 group setup, the first group you lured to the brush will be the first group to reach level 9, and over time, they will be the group that gets the most amount of XP from the 3 groups. The reason is because when stacking, they receive XP from you three times compared to the other groups prior to completion of setup. The last group you lured to the super group will be the group that levels up the slowest, and the order goes from the first group you pulled, to the second, then to the last, and so on. The way the XP is divided is as follows: for example, say you gave a total of 300 XP for the whole group. Divide that by half, and 150 XP will be divided evenly between the first group, giving each Charr in that group 50 XP for one kill. The remaining 150 XP now gets divided three ways. 66% of that XP(100 XP) is now divided evenly for the second group, giving each Charr in that group 33 XP. The last remaining 50 XP is now divided between the third group, giving them a measly 16.6 XP each. So, no matter what you do, you will always find a group that will achieve a high level first, followed by the other two groups that are always trailing and lower in levels.
This is why I suggest that the optimum scenario is a 3 group, 3 Charr method. It is the best output of XP for all the Charrs rather than having more than 3 groups in the setup or having 3 groups of 4 Charrs in the setup. XP is strained already as it is, there is no need to dilute it further with more Charrs in the setup. The goal in Death Leveling is to accommodate as much XP to each Charr as possible inside the 10/12 hour window BEFORE you become a victim of the dreaded error 59. This method is best suited for those who plan to go completely AFK while Death Leveling.
*** KEY TIP *** - If you can afford to NOT be afk, then in addition to the above, wait until one group reaches your current level. Once they achieve your level, kill the caster of that group for 100 XP. Now STOP! Do not kill the melee Charrs. By killing the caster of that group, you have triggered another refresh on their AI, and that group now goes to the bottom of the exp pool while other two lower level groups are bumped up one spot in the XP food chain. By using this method, you keep the constant melee barrage on yourself without suffering a slower time to die due to loss of Charr bodies.
Team Setup
If you have a high level partner/friend/guildie you can death level with, or have a 2nd account with another high level toon on it, team setup might be the right course for you. BUT, only do so if your partner is willing to not receive any XP for any of the kills while sitting there for 8-10hrs doing nothing. Team setup takes the same approach as the solo setup for the exception of one major change.
On team setup, toon A will lure the first group to the brush, while toon B lures the 2nd group to the little house. After you both rez, toon A will stop luring Charrs, but instead agro the 2nd group and mesh it with the 1st group. Toon B keeps luring other groups to the little house. Keep this method working until you have lured all six patrol groups. This method is used primarily to resfresh AI target acquisition from one toon to the other, so that this super group gains XP on a more leveled and evenly basis compared to the solo setup. This fact is the major difference in team vs. solo setup. Also, on team setup, having one group of Charrs reach your current level takes half the time compared to solo setup. Two reasons why this happens. First, the XP output to Charrs is doubled (if both your toons are the same level). Second, having 2 or 3 Ashen Claws will incur the Mark of Pain skill, which deals massive spamming damage to the toon that is not taking any melee damage, thus making both toons die faster. So, if you possess a dummy account or a partner who is willing sacrifice XP, this is the single, fastest way to achieve massive XP in the shortest amount of time.
The method used to make sure only your toon gets the XP for every kill is to equip yourself with armor and weps when you are ready to attack the leveled up Charrs. By having everything equipped, the enemy AI will dictate you have a better armor rating when compared to the other toon, thus, they will concentrate in killing the naked toon first before coming after you. Go after the high leveled Charr during this time and during the 4-5 second Invinci-mode right after rez. You will not be able to kill a Charr in one health bar span, but their health will not regen much either while you are dead. Once their HP is really low, the trick is to wait for the other toon to die BEFORE you go for the final killing swipe on the Charr you targeted. This way, the Charr dies, giving you full XP and none for your partner. If the other toon is alive while you kill the high level Charr, then XP is halved for you and your partner, and is no better than if you had done a solo setup. Lastly, it is recommended that you do pull all 6 of the remaining Charr groups if you do team setup, like the picture below.

Questions & Answers
1) You said there are seven patrols, yet on solo and team setups, you mention the max of six patrols lured. Is there any way to lure this initial patrol to the setup?
Yes, there is. Having ALL seven groups to the rez shrine is doable, but it is an advanced skill. Mastering and getting used to this setup is optimal for the time being and you won’t lose any benefits by killing the first patrol at this time.
2) Isn’t is more beneficial to wait and kill the Charrs when they get to 19 or 20 as opposed to my current level?
ONLY if you have to be AFK. In theory, it sounds like more XP, but it is not. It is more time consuming for a group of Charrs to reach the higher levels since they follow the same structure of XP as we do. For example – from level 17 to 18, it requires a total of 11,600 XP per character. That applies for Charrs too, but multiply that by three (or four) in that group. For each level the Charrs gain (starting 5 levels below you, eg. – you are level 17, Charr is level 12), will net you a total of 16 XP per Charr. The only exception to this rule is when Charrs are one level below you or above you. For example, if you are level 16, when the Charr is level 15, it would net you 80 XP, but when they reach your level, they will net you 100 XP, and when they reach level 17, they would net 120 XP. The XP given by Charrs rises by 20 when reaching your level and once more when surpassing your level by one. After that, they revert back to increasing by 16 XP for each level gained. Timewise, it is more beneficial to kill them at your level and allow the next group to play catch up.
3) Item Levels are better at higher Charr levels?
This has been a rumor, yet I am sorry, it's just not happening. The degree of how good an item is if you kill a higher level Charr has been discussed over and over. The fact is, a higher level does not translate into a better item drop, more gold, or unsalvaged runes in Pre-Searing. All these items are random and stay random for the Charrs, no matter what level you kill them at. I have a Sundering (20/17) Battle Axe (6-16 dmg) purple drop. Know what gave it to me? A level 7 Shaman. I also had a purple Smiting Staff dropped by a level 20 Charr. Know what mod it had? +12% Pruning damage vs. plants. >.< I have tested this over and over, and sadly, just not gonna happen for us.
4) Woo hoo! I found a -20 Hp offhand I can use for death leveling. This will sure come in handy....
Well, yes and no. This is also part of an endless HP vs. armor discussion. Those offhands also come with a permanent +4 or +5 armor to compensate for the loss of HP. A -20 HP is equal to a single hit received from an axe fiend on a naked toon. On the other hand, the armor mod is permanent until you die. It’s your choice if you want to use one while Death Leveling. I don’t bother with one either way, and I have come across them in three separate drops. (Now if you had a negative HP offhand WITHOUT constant armor, that would be a different story.)
5) Should I use Bleeding, Degen, Ele (Firestorm) skills when killing high level Charrs?
Yes and no. If you must use them, only do so when the Charrs have a near full bar of health. DO NOT use these skills when the Charrs are at low health levels. If you die after inflicting this skill, and if you do not rez in time before the Charr dies, then you will NOT receive the XP from that Charr. You will be cursing the rez timer and it's inherent slowness. (Been there, done that.) Do you really want to throw away a good chunk of hard earned XP just because you had the desire to kill a few seconds faster? [One way to determine if you did get XP from a kill is to verify the item or gold drop after the death of a Charr. If your toon and the Charr died at the same time, and there is no item/gold drop, then you DID NOT gain any XP.]
6) Troll Unguent
One of the best skills available in Pre for doing setup. This skill, when activated before you engage and move the super group to the sandlot comes in very handy. NOT a requirement for anyone, but one of my personal favorites.
7) Strider vs. Charr Death Leveling
"Dude, your guide is too confusing, I won’t use it. I refuse. Death Leveling through striders/spiders is much easier." Okay. It’s your choice, but do keep in mind the following fact. Trying to get the perfect 3 or 4 strider group setup, then waiting for ONE strider to reach the same level 8 as the Charrs normally begin with, takes LONGER than completing the above Charr setup. Also take into consideration that you will have a level 20 strider fast, but that equates to one kill and one source of XP, before having to restart the same process over again. By Charr Death Leveling, it becomes a process that is 8.4 times faster than strider leveling, thus eventually reaching level 20 faster. Would you rather have a level 20 strider faster or your own level 20 toon faster?
Closing Notes
Even by following this guide step-by-step, a ton of dedication, patience and perseverance is required to achieve this title. It is NOT something you can achieve in one week. A single maxed title should not be easy to get. If so, what would be the point of it?
Unlike many of you who are planning on keeping your level 20 character in Pre permanently, I do not plan on remaining in Pre after I achieve the title. My personal goal and sole reason why I started this journey was to see if I could achieve it myself. As soon as I get to 20 and receive my title, I plan to leave immediately to Post. I am not the type that likes to show off and don’t intend to do so and act almighty in Pre once I get there. That is the reason why I decided to share every single secret, trick and tip in this guide with everyone who reads it. It took months to get everything right (due to the "constant chasing" AI nerf in between) and my only hope is for those who read this guide, to find something useful, helpful or something you didn’t know but can help you in your own journey.
My outmost thanks and gratitude goes out to MZXG for all the help I have received and still receiving in making this guide a reality. You are a true pioneer.
To NA, thanks for being my partner, even though you are still ‘slow’ in my eyes.
To Amish Is Leet, thanks for offering to show others how to perfect this system in-game through personal tours.
To the rest of you, enjoy the guide and see you when you get to level 20 in Pre-Searing!
Yours Truly,
Holy Warblade
Death Leveling